Pages

Friday, March 29, 2013

Paleo Easter Treats: Recipe Round-Up

Source: Angie's Suburban Oasis
Happy Good Friday to all!

Sunday is Easter and many of you will be spending time with your friends and family celebrating the holiday. Some traditions may include coloring Easter eggs, conducting Easter egg hunts, making chocolate bunnies and indulging in other spring-related treats. I've rounded up a list of Paleo treats you could make for the special day.

  1. Carrot Cake Pancakes by Multiply Delicious
  2. Carrot Cake Cookie Bars by Real Sustenance
  3. Paleo Creme Eggs by The Paleo Mom
  4. Healthy Easter Basket Ideas by Robb Wolf
  5. Lemon Curd Bars by The Nourishing Gourmet
  6. Carrot Cake Muffins by Livin Paleo
  7. Chocolate Almond Butter Bunnies and Eggs by Healthy. Happy. Life. (recipe calls for peanut butter, but use almond butter or Sunbutter to make it Paleo)
  8. Lemon Cookie Tarts by Healthful Pursuit
  9. Healthy Cadbury Creme Eggs by Chocolate Covered Katie
  10. Carrot Cake Milkshake by Chocolate Covered Katie
If treats aren't really your cup of tea, here are some great resources on how to color your eggs naturally, without the use of food dyes. 
  1. What's Cooking America
  2. Better Homes & Garden
  3. Vegetable Gardener
Growing up, we always had Easter egg hunts. My parents did an incredible job hiding the eggs. They would hide green eggs in the plants around the house, pink eggs against pink furniture and so on. They usually put a combination of candy and money inside the eggs. My brothers and I took the hunt very seriously. We did this up until I was 16 or 17 (and my brothers are older than me). 

My husband and I don't have any kids, so the Easter egg hunt won't be on our agenda. However, the carrot cake pancakes and lemon cookie tarts both sound amazing though. I may have to indulge a bit on Sunday and try out those recipes. Sunday is the the last day before I get serious about getting lean. While some will be ending their Lenten sacrifices, I will just be starting my purification period. 

What will you be doing for Easter? Do you have a special meal planned? I would love to hear about how you celebrate the holiday. 

Hoppy Easter and enjoy your weekend! 

Wednesday, March 27, 2013

Paleo Hamburger Deluxe Meatza

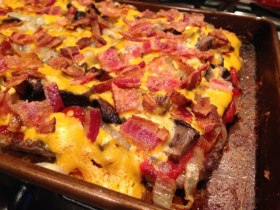
Hamburgers. Pizza. Bacon. Combine it all together and you get a Hamburger Deluxe Meatza. I was inspired last week when I made PaleOMG's Meat Quiche Crust. I was so excited as I lied down for bed that night that I could hardly sleep. My mind started thinking of all the different creations for meatzas. I came up with this idea for a hamburger deluxe meatza. What does deluxe mean? I consider deluxe a hamburger with mushrooms, onions and bacon. I also knew I couldn't make a meatza without some sort of "cheese." I came up with a "cheddar cheese" sauce with raw cashews, nutritional yeast, basil, red bell pepper and garlic. Such a fantastic meatza. I can't wait to create my next one!

This recipe seems like it's labor-intensive. There are a few parts to making it. Some can be done in advance, such as: cooking the bacon and slicing the mushrooms and onions. Be sure to soak the raw cashews in a bowl of water. I typically do that part in the morning before going to work. If you plan a little bit, the cooking and assembly will be a breeze.


Hamburger Deluxe Meatza

Serves: 5-6

Ingredients:

Meatza Crust:
2 pounds grass-fed ground beef
1 egg
1 t. onion powder
1 ½ t. garlic powder
Sea salt and pepper, to taste

Toppings:
2 T. fat of choice (I used coconut oil, though you could use bacon grease since you are cooking bacon)
2 onions, thinly sliced
3 Portobello mushroom caps, sliced
8 slices bacon, crumbled
1 15 oz. can sugar-free pizza sauce (I used Muir Glen Organic)

“Cheddar Cheese” Sauce:
1 ½ cups raw cashews, soaked in water for at least 6 hours
1 small to medium red bell pepper, cut into a few large pieces
3 garlic cloves
2-3 T. fresh basil leaves
2/3 cup nutritional yeast
Sea salt and pepper, to taste

Directions:

Preheat your oven to 375°F.

To make the crust:

  1. Mix all crust ingredients in a large mixing bowl. You may have to get your hands meaty in order to combine everything.
  2. Pour onto a rimmed metal baking sheet and spread into a thin, consistent layer. I used a 15.25” x 10.25” pan.
  3. Bake in the preheated oven for 15 minutes.
  4. Drain off excess grease (there will be quite a bit).
To make your toppings:

  1. Cook your bacon. I prefer to bake it in the oven (this can be done in advance). If you cook it in the frying pan, you can use the leftover bacon grease to cook your onions and mushrooms. Once cooked, crumble and set aside.
  2. Melt fat of choice in a large pan over medium heat.
  3. Add your onions and toss in the fat so they’re all coated. Season with a dash of sea salt. Cook, stirring occasionally, for about 15 minutes.
  4. Add sliced mushrooms and toss. Sauté, stirring occasionally, for an additional 6-8 minutes, or until the mushrooms are cooked.
  5. Set aside.
To make your “cheddar cheese” sauce:

  1. Drain and rinse the raw cashews. Add to a high-speed blender (I use my Vitamix). Add enough fresh water just to cover the top of the cashews. Blend until smooth.
  2. Add bell pepper, garlic, basil, nutritional yeast, sea salt and pepper. Blend until everything is incorporated. Taste and adjust seasonings, as needed.
To assemble your meatza:

  1. Spread pizza sauce on top of your meat crust. You may not use all of the sauce, so save leftovers for another use.
  2. Add your mushrooms and onions atop the pizza sauce. Spread them evenly across the entire meatza.
  3. Ladle the “cheddar cheese” sauce over the top and cover the entire meatza. You'll have extra sauce. It can be used in/on omelettes in the morning. 
  4. Sprinkle the crumbled bacon on top.
  5. Put back into the oven for 6 minutes. Turn your broiler on high and cook for 4 more minutes.
  6. Cut into 5 or 6 pieces and enjoy! Serve with a simple side salad to round out the meal.


This meal was love at first bite. The meat crust was so incredibly moist (I was worried it would turn out dry). The pizza sauce blended perfectly with the “cheddar cheese” sauce. The bacon added a beautiful crunch. After making and devouring this meatza, I am even more excited to get to work on my next one. I have a really phenomenal idea in mind and hope it turns out as amazing as this one. 


If you like this recipe, please share on Pinterest and Facebook. I appreciate your support! 

Thursday, March 21, 2013

Paleo Tuna Salad


I've been making tuna salad for ages. This is just a basic recipe that I came up with. I love the combination of flavors and colors along with the crunch from the veggies. We ate ours atop mixed greens and also added diced avocado (not shown in any of the pictures). The avocado really shined with the tuna. I've been making this version for a while, but never really documented the ingredients or measurements. Something else that's great about tuna salad is that it can easily be adjusted depending on how many people you're feeding. Just add extra cans of tuna, veggies and a tad more mayo and Dijon to coat it all. Hope you enjoy it as much as we do!

Paleo Tuna Salad 
Serves: 4-6

Ingredients:

  • 3 - 5 oz. cans wild-caught tuna
  • 3 stalks celery, diced
  • 3 carrots, diced
  • 1 red bell pepper, diced
  • 1/2 cup mayonnaise (I used Lemonaise), but homemade would be awesome
  • 1 - 1 1/2 T. Dijon mustard
  • Sea salt and pepper, if desired
Directions:
  1. Drain cans of tuna, pour into a bowl and flake with a fork. 
  2. Chop your veggies and add to the tuna. 
  3. Add mayonnaise and Dijon mustard. 
  4. Stir everything together until combined. 
  5. Taste for seasonings. Mine didn't need any as the Lemonaise and Dijon added plenty of flavor.
  6. Serve on mixed greens, on Paleo bread, in a Pure Wrap or in a lettuce/Chard/Collard Green leaf. Top with avocado. 
My husband's coworker called the salad (topped with avocado) a masterpiece. My mom said the salad was so colorful. Here's the best compliment: my husband was originally going to eat pizza and salad for lunch that his work was providing. After eating dinner, he decided he wanted leftover tuna salad for lunch. He chose my tuna salad over free pizza! That was really sweet. 


This takes so little time, but is packed with flavor. Enjoy! 

Wednesday, March 20, 2013

Paleo Chicken a la King


If I had to describe Chicken a la King in one word, it would be 'yum.' I've always had a fondness for this dish. My mom used to make it quite a bit while I was growing up. I loved it. She made her version with mushrooms, green peppers, chicken and pimentos, but the sauce was made with Campbell's Cream of Chicken soup. I won't touch that stuff with a ten-foot pole. They don't even list the ingredients on their website. You know why? It's not real food! Who would buy it if they actually read and understood the label? Yuck!

I was talking to my mom on the phone last week and mentioned I was in the mood for Chicken a la King. I asked her how she made hers. I then started thinking about how I could convert the sauce to Paleo. Hmm... creamy chicken-y sauce. I know. I can use cashews + chicken broth so I get that creamy and chicken-y flavor. To thicken it, add a little arrowroot. It worked like charm! Arrowroot is magical! I am super excited that this recipe turned out so amazing on the first attempt. I love it.

This dish is quite heavy though. It's very rich, so a little goes a long way. As I was eating the leftovers for lunch today, I realized I shouldn't have packed as much as I did. Oops. I ate it anyway, because it was that delicious. Plus, I needed refueling for my bike ride home from work. I do recommend serving this over your favorite Paleo bread (this one from The Paleo Mom or this one from Against All Grain), favorite biscuits (these from Real Sustenance), cauliflower 'rice' or grain-free pasta (Cappello's fettuccine). I know, I know. Pasta, biscuits, bread. You shouldn't be Paleoizing SAD foods. I believe in treating yourself. I made The Paleo Mom's yeast bread last weekend and it was amazing. Do I want to eat it all the time? No way. It's a great treat though. Will I eat Cappello's pasta all the time? No. I can't afford to + I don't need nor want pasta regularly. Please note there's a small amount of potato starch in Cappello's pasta, so if you are strict Paleo, you may want to give Kelp noodles or zucchini 'noodles' a try for this dish.

Without further ado...


Paleo Chicken a la King
Serves: 6

Ingredients:
4 T. coconut oil, divided
1 ½ pounds chicken tenders, cut into bite-sized pieces
8 oz. mushrooms, sliced
2 small green bell peppers or 1 large green bell pepper, diced
2 – 4 oz. jars of pimentos, drained
1 ½ cups raw cashews, soaked in water for at least 6 hours
1 cup fresh water
1 ½ - 2 cups chicken broth (preferably homemade)
1 ½ T. arrowroot powder
Sea salt and freshly-ground pepper, to taste

Directions:
  1. Melt 2 T. coconut oil in a large skillet (with tall sides) over medium-high heat.
  2. Add diced chicken. Season with sea salt and pepper. Cook for 5-6 minutes and flip. Continue cooking until no longer pink. Remove chicken and juices from pan and reserve for later.
  3. While chicken is cooking, make the sauce. Drain and rinse the raw cashews. Add to blender or food processor (I use my Vitamix), along with fresh water and chicken broth. Blend until smooth. Add arrowroot, sea salt and pepper and blend again until everything is incorporated. Set aside.
  4. Melt remaining 2 T. coconut oil in the skillet.
  5. Add green peppers and mushrooms. Season with sea salt and pepper. Cook, stirring occasionally, until mushrooms are browned and bell peppers are slightly soft. It’ll take 6-8 minutes. 
  6. Add the cashew-chicken broth sauce to the skillet. Stir to combine. The sauce will thicken as it heats.
  7. Add chicken back to the skillet and mix together.
  8. Finally, add the pimentos and give everything a quick stir.
  9. Serve over your favorite Paleo bread, cauliflower rice or Paleo pasta (as mentioned above). 


Chicken a la King smothering a slice of Paleo bread.

This really hit the spot. It reminded me of what my mom used to make. Childhood memories + yummy food = totally satisfied and missing my family. Luckily I get to see than in a little over a month! 

Question of the day: what dishes or foods remind you of your family? 


Saturday, March 16, 2013

Alternatives to Potato Hash Browns, Part 3: Jicama

This is the third part in my series of alternatives to potato hash browns. If you're just joining us, I decided to go on a quest to find the best alternative to potatoes. I grew up with my dad making potato hash browns pretty much every Sunday for our big family breakfast. I love hash browns. Crispy and brown potatoes seasoned with salt and pepper. Bacon. Sausage. Eggs. Bread from the local boulangerie. Oh, those Sunday breakfasts were lovely.

Recap:
Part 1 - Celery Root - crisped and browned nicely. Was able to flip in mostly one piece (better to make in a small or medium sized frying pan so you can flip over in one piece). Didn't burn (maybe I paid closer attention to it). Tasted potato-ish with a slight sweetness.

Part 2 - Rutabaga - they would not stay together. Maybe there's not enough starch, but they are better as an actual hash with other veggies or the base of hash brown casserole.
And here we are with Part 3. I used jicama this time. Jicama is a root vegetable that originated in Central and South Americas. It can be eaten raw and is often used in slaws or salads. It has a crunchy, sweet flavor when raw. I ate jicama in a fish taco dish from Snooze back in my Pre-Paleo days. They made a jicama slaw to top the tacos. That's the only time I remember eating jicama in my life (until recently). I think jicama would make a pretty good baked French fry. Jicama has only about 46 calories in a cup vs. about 120 calories in potatoes. Jicama is full of fiber and Vitamin C. It also contains B-Vitamins, Magnesium, Copper, Iron and Manganese.

Here's how I made my jicama hash browns. It's super easy to do, especially with a food processor. However, I did soak my sliced jicama in warm water overnight. It softens them a bit. I don't think it's necessary for hash browns, but you would probably want to do that when eating it raw.

Also, something to note, jicama seems to be waxy on the outside. That's normal. You're going to peel the skin off before shredding.

Jicama Hash Browns   
Serves: 2-4 (depending on appetites)

Ingredients:
2 small or medium jicama (or 1 large), shredded
2-3 T. fat of choice (I used coconut oil)
Sea salt and pepper, to taste

Directions:

  1. Slice the jicama into one to two inch slices. You can soak overnight in a covered pot of warm/hot water, but this step is optional. If you choose not to, just skip ahead to Step 2.
  2. Peel the skin off the jicama slices with a knife. 
  3. Shred the jicama in the food processor or by hand with a box grater. 
  4. Heat the coconut oil in a large frying pan over medium-high heat. 
  5. Add shredded jicama. Pat down with a spatula and shape it into a round. Season with sea salt and freshly-ground pepper (to taste). They won't need as much salt as potatoes, so go light on it. You can always add more when you taste them. 
  6. Cook for 5-7 minutes, or until the underside is golden. You may need to lift up the browns a bit to check. 
  7. Flip and cook on the other side for another 4-5 minutes. 
  8. Serve with other breakfast foods. We ate ours with fried eggs, bacon and a Honey Almond Breakfast Cake (similar to a biscuit). 


The jicama lost quite a bit of sweetness during the cooking process. It still has a crunch, even when cooked. I did like it, but it doesn't fulfill my childhood memories of hash browns.

In summary, I would rank my hash brown alternatives as follows.

  1. Celery Root - closest in flavor and presentation
  2. Jicama
  3. Rutabaga
I received a great suggestion for another alternative: Daikon radishes. Have you ever eaten a Daikon radish? If so, how was it prepared? I've seen them at the grocery store and even said to my husband, "I wonder what you do with these. I need to do some research." I'll give it a shot sometime soon. 

Monday, March 11, 2013

Creamy Cauliflower Soup with Broccoli, Bacon & Chives


Recipe ideas hit me at random times. I thought up this soup on a random afternoon at the office. It just popped into my head. Typically when this happens, I will write out the initial ingredients that I think would mesh well together. When I first thought of this recipe, I thought I would use mushrooms, potentially nutritional yeast and not use a rutabaga. The rutabaga came up when I thought of the hash brown alternatives. I'm going to jump in head first tonight with the recipe, because it's getting late and my 5:30am spin class will be here before I know it. 

Creamy Cauliflower Soup with Broccoli, Bacon & Chives
Serves: 6

Ingredients:
3 T. fat of choice (I used coconut oil)
1 onion, diced
1 rutabaga, diced
4 stalks celery, sliced
4 cloves garlic, minced
1 medium head of cauliflower, cut into florets
6 cups chicken broth (preferably homemade)
2 cups water
4 cups broccoli florets
12 slices of bacon (to garnish)
6 T. chives, green onions or scallions, chopped (to garnish)
1 t. dried rosemary
Salt and pepper, to taste

Directions:
  1. Cook your bacon. I typically bake mine in the oven on a baking rack (over a pan, of course) for about 20 minutes at 400 degrees. If you prefer to fry bacon, you can do that. The point is to get the bacon cooking while tending to the soup. 
  2. Melt your fat of choice in a large soup pot over medium-high heat. 
  3. Add onion, rutabaga, celery and garlic to the pot. Cook, stirring occasionally, for 5-7 minutes. Season with sea salt, pepper and rosemary. 
  4. Add the chicken broth, water and cauliflower to the pot. Bring to a boil and let simmer over medium heat for 15 minutes, or until cauliflower is soft. 
  5. Blend the mixture with an immersion blender or in batches in your food processor or stand blender. Add back to the soup pot (still on medium heat). 
  6. Add broccoli florets to the soup. Cook for 6-8 minutes, or until broccoli is tender to your liking. You can cover the pot with a lid to steam the broccoli. 
  7. Taste test the soup for seasonings. Make adjustments as needed. 
  8. Ladle soup into bowls. Top with two strips of crumbled bacon and a tablespoon of chives, green onions or scallions (I used chives). 
  9. Enjoy! 

This soup would be delicious with a slice of Paleo bread or Paleo biscuit. I have a few biscuit and bread recipes that I love. This one (without the honey for a more savory taste), this one or maybe this one

My bed is calling my name. Must get a good night's rest tonight. Have a good week! 

Sunday, March 10, 2013

Alternatives to Potato Hash Browns, Part 2: Rutabaga


On Saturday, I started the series for alternatives to potato hash browns. I wanted to find the best veggie to use for hash browns. As I mentioned in my previous post, I have fond memories of Sunday breakfasts with my family. One of the foods that my dad had perfected was potato hash browns. They were crispy, salty and had a little bit of olive oil still lingering. So good. There's honestly nothing quite like biting into my dad's hash browns. White potatoes are a Paleo no-no, so I'm here to find the best alternative.

Saturday, I made celery root hash browns. Those actually browned nicely and got a little bit crispy (depends on how much coconut oil you use). They had good flavor. Stayed together when flipping them (mostly). If I had to grade the celery root, I would give it an A.

Moving on... I made rutabaga hash browns. I do like rutabagas quite a bit. They're quite tasty when mashed (you could even add a little chicken broth for extra flavor and richness). I used a rutabaga in my soup tonight to add some body and creaminess (it's a pureed soup). But as hash browns...

I wasn't a huge fan to be honest. I put them in the pan, patted them down into a circle and then left the room for a bit. Ok, I really went into the living room to sit in my recliner. I was just giving them time to cook and get golden brown. You know what they say, "A watched pot never boils." I think I left them a bit too long, because they burned a little. They didn't stick together at all like hash browns should. Rutabaga hash browns will have to be stirred regularly, to ensure they don't burn. Also, as long as you don't expect them to crisp up, then you may like them. I think rutabaga hash browns would be good as a base to a hash brown casserole.


Rutabaga Hash Browns
Serves: 2-3

Ingredients:
2 rutabagas, shredded
2 T. coconut oil
Sea salt and freshly-ground pepper, to taste

Directions:
  • Melt the coconut oil in a large frying pan over medium-high heat. 
  • Prepare your rutabagas: cut the tops and bottoms off and then peel them. 
  • Shred the rutabagas in a food processor (with shredder attachment) or with a box grater. 
  • Add shredded rutabaga to the hot pan. Flatten with a spatula and shape into a circle. 
  • Season with sea salt and pepper. 
  • Allow to cook for 2-3 minutes. Stir them around so they don't burn. Continue cooking and stirring every couple of minutes (or more frequently) for a total of 12-14 minutes. You can also turn the heat down closer to medium so they won't burn as easily. 
  • Serve with other breakfast foods, such as eggs and bacon or sausage. 

These would probably be tasty with over-easy or sunny-side-up eggs, so the yolks glaze the hash browns. Overall, I'd give these a C. They weren't terrible, but they didn't live up to my expectations. I highly recommend giving rutabagas a try though, even if you just make mashed rutabagas. It's definitely a tasty root vegetable to add to your arsenal.

The third, and final, part of the series will happen next weekend. Can you guess what root vegetable I'll be using for my final test? 

Saturday, March 9, 2013

Alternatives to Potato Hash Browns, Part 1: Celery Root

I decided to do a three-part series on alternatives to potato hash browns. I've been experimenting the past couple months with different root veggies in order to recreate my childhood memories of Sunday breakfasts. Every single Sunday morning (until I left for college), my dad prepared big breakfasts of hash browns, bacon and/or sausage, eggs and toast (or English muffin). Occasionally, he would switch it up and make pancakes or French toast, but would still often make some hash browns, bacon and/or sausage and eggs to go alongside. It was always a special meal in our house. It was something I definitely looked forward to all week. We would typically eat around 9 or 9:30am. We also enjoyed homemade freezer jam (strawberry and black raspberry were common in our house) atop our toast. My mom often made large batches so we would have delicious jam all year long. After breakfast, we all sat around the table reading the newspaper. My brothers and I would read through the sports, comics and coupons. My parents had a little thing going that they would pay us the amount they saved in coupons. It was a great incentive for us to find coupons on items we bought. Sometimes I would walk away from the grocery store with $4-5. That was a lot of money back then! Lots of fond memories of those breakfasts though.

White potatoes are generally a big no-no on the Paleo lifestyle. They're extremely starchy and higher in both carbs and calories compared to other root vegetables. Potatoes have around 118 calories per cup (shredded) while celery root only has 42 calories. Potatoes have three times the carbs (27 grams). Celery root is a very nutritious food containing potassium, manganese, magnesium, Vitamin C, Vitamin K, Vitamin B6, phosphorous and fiber. You now know celery root is a healthier option for our bodies. What you may not know is that celery root is the "ugly stepchild" of vegetables. If you can get past how it looks, you'll (hopefully) discover an amazing ingredient that can be used in so many ways. Of course, I made my celery root into hash browns, but they could also be pureed/mashed or used in soups.

I found celery root at Sprout's (in Colorado), but you could also find them at Whole Foods or King Soopers/Kroger. It's most likely something you have walked by, not thinking anything of it or giving it a second look. I know I have. Hundreds of times. It's right there by the mushrooms, hot peppers and Brussels sprouts. Or maybe you're one of the few that has looked it and wondered what on earth do you do with that thing? Well, I'm here to share with you one way to prepare that ugly-looking root veggie.

Gather your equipment.

I used my food processor to shred. You could also use a box grater, but it will take a bit longer. I thought I would pour my shreds into a separate bowl, but I ended up pouring them straight into the frying pan. So, here's my recipe that's not really a recipe.

Celery Root Hash Browns
Paleo Rating: 8.5
Serves: 2-3

Ingredients:
2 celery roots
2 T. coconut oil
Sea salt and pepper, to taste

Directions:
  • Prepare your celery root. Cut off the tops and bottoms. Then cut around the edges to get the skins off. You'll end up with what's in the picture to the below. I cut mine in half, so you'll just have a couple round bulbs.
  • Heat the coconut oil in a large frying pan over medium-high heat. 
  • While the pan is heating up, shred the celery root in your food processor or with a box grater by hand. 
  • Add the celery root to the hot pan. Use a spatula to flatten the celery root and straighten the edges (should be in a round shape). 
  • Season your celery root with sea salt and freshly-ground pepper. They won't need as much salt as potato hash browns, so take it easy at first. You can always add, but you can't take it away. 
  • Allow it to cook on one side for 7-8 minutes, or until golden brown. Do your best to flip them in one piece. Otherwise, flip them in a couple of pieces. Let them cook for 3-5 minutes on the other side. Cut and serve with eggs and sugar-free breakfast sausage or bacon. 
  • Enjoy! 
      

As you can see, mine didn't flip in one piece, but they did brown up quite nicely. I did notice celery root has a slightly sweet flavor. It's not a strong flavor, but compared to potatoes, they are just a tad sweet. Otherwise, they're a great Paleo substitute for hash browns. I highly recommend giving celery root a chance.
Breakfast is served.

Next up: Rutabaga hash browns.

Wednesday, March 6, 2013

Homemade Almond Milk


Who knew almond milk was so easy to make? I've run across and repinned recipes on Pinterest for coconut milk, sunflower seed milk and almond milk. I figured I would get around to making them at some point. I had a feeling it would taste better than the store bought milks, but thought it would be a daunting project. After pouring out yet another practically-full carton of unsweetened almond milk, I decided it was time for me to make my own in small batches. Smaller batches would allow me to test a few kinds and reduce waste. So... the search began for a recipe with different flavors.

I take no credit for this recipe. I found My Life In Food's amazing post on almond milk. I headed out to buy some cheesecloth (found some at Bed Bath & Beyond) and raw almonds from the bulk section at my local market. I already had the vanilla extract, cocoa powder, honey and sea salt.

I used my Vitamix, though I'm sure you could use a regular blender as well. It may take a little bit longer to blend. I made three different kinds during my milk-making afternoon: Vanilla, Chocolate and Unsweetened.

Unsweetened Almond Milk
Makes approximately 1 quart

Ingredients:

  • 1 1/2 cups raw almonds, soaked for 8 hours or more (I let them soak overnight in the covered Mason jar filled with water)
  • 4 cups fresh water
  • 1/2-1 t. vanilla extract
  • a pinch of sea salt
Instructions:
Drain the almonds in a strainer and rinse. Also rinse out the Mason jar, since you will be using it to store the milk. Add almonds and fresh water to your blender and blend until well blended. Ok, that's a tongue twister - try saying that five times fast. Pour the mixture into a cheesecloth lined strainer over a large bowl (I use a glass mixing bowl). You could also use a Nut Milk Bag. I just purchased one and haven't had a chance to use it yet. Rinse your blender out too. You'll be using it again and don't want any leftover pulp. Anyways, after you've gotten most of the liquid into the container, squeeze together the cheesecloth and wring out the remaining liquid. You can keep the pulp for other uses later on. Pour the strained almond milk back into the blender along with the sea salt and vanilla. Blend to mix everything together. Pour into your Mason jar and store in the refrigerator for up to a week. This milk will turn sour, just like any other milk. Trust me. It just happened to me. I took a sip of the milk and poured it out. If you don't use a lot of milk, then make a smaller batch. All of these recipes are easily adapted to smaller amounts. 


Chocolate variation: Follow the same basic instructions as above. When you put the strained almond milk back into the blender, add the pinch of sea salt, 1 1/2 t. vanilla extract, 4 T. raw honey and 4 T. cocoa powder (I used Dutch-Processed, but raw cacao powder would also be amazing). Blend until combined and pour into the Mason jar for storing in the refrigerator. The chocolate is my favorite. It goes fast! 

Vanilla variation: Follow the same basic instructions as above. When you put the strained almond milk back into the blender, add the pinch of sea salt, 1 1/2 t. vanilla extract and 2 t. raw honey. Blend until combined and pour into the Mason jar. 

All of these flavors should be used within a week, as mentioned above. The entire process took me less than 30 minutes and that's making THREE flavors! I'm getting more efficient each time I make it. This milk tastes so much better than store-bought, just as I suspected. If you haven't made your own yet, do it! Stop spending $2.99-$3.99 per carton and make your own. Customize your milk with whatever flavor(s) your prefer. 

Next time I'm going to try making coconut milk using coconut shreds. How hard can it be? I've already mastered almond milk. 

Question of the Day: What kind of milk is your favorite? Almond? Coconut? Hemp? I was never a milk drinker growing up (cow's milk). I didn't like the flavor at all. However, I love almond and coconut milks. I'm a big fan of the chocolate. That was pretty much the only way you could get me to drink cow's milk - mixed with lots and lots of chocolate syrup. 

Monday, March 4, 2013

Paleo Chicken Pot Pie


There was a reason I waited to post this after my chicken in a Crock Pot & homemade broth recipe. That is a great way to prepare chicken and make your own broth for my Paleo Chicken Pot Pie. As I've said before, I absolutely love comfort foods and casseroles. In my future cookbook, I'll have a huge section devoted just to casseroles. I've always been a fan of mixing foods together into one pot or dish. Why not?

"The whole is greater than the sum of its parts." -Aristotle

Combining delicious foods together makes something exponentially better, in my humble opinion. I threw together my recipe after scouring many other pot pie recipes - both Paleo and non-Paleo. Peas were obviously out of the equation. I wanted to make a creamy sauce for the filling. Cashews are my go-to for creamy sauces. I'm sure one could use canned coconut milk to make a creamy sauce as well, but I prefer cashews since they have a more neutral flavor. Arrowroot serves as a great thickener, as long as you don't use too much. Too much arrowroot can create a gummy texture in foods. Trust me, I made that mistake once. I tried making dumplings out of mostly arrowroot for chicken and dumplings. Not good.

So, here's my version of Paleo Chicken Pot Pie. It's creamy and comforting. Love it. I'm still a novice with baking, so I found an amazing crust recipe that worked really well.


Paleo Chicken Pot Pie
Paleo Rating: 8 clubs
Servings: 8

Ingredients:

Filling:
  • 2 T. fat of choice, for sautéing veggies + more to grease the dish
  • 1 onion, diced
  • 4 carrots, diced
  • 3 parsnips, diced
  • 4 celery stalks, diced
  • 8 oz. mushrooms sliced
  • 3 garlic cloves, minced
  • 4-5 oz. spinach
  • 3 cups chicken, shredded or diced
  • 1 cup raw cashews, soaked for at least 4 hours
  • 2 – 2 ½ cups chicken broth, preferably homemade
  • 2 t. poultry seasoning    
  • ½ t. rosemary, or to taste                                      
  • ½ t. thyme, or to taste
  • ½ t. sage, or to taste
  • 1 t. coconut aminos
  • 2 T. arrowroot
  • 4 garlic cloves, whole
  • Sea salt and freshly-ground pepper, to taste

Crust:
Courtesy of Paleo Perfectly
  • 2 ½ cups almond flour (I used Honeyville)
  • ½ t. sea salt
  • ½ t. baking soda
  • 2 eggs
  • ¼ cup coconut oil or ghee (I used coconut oil)
Directions:
  1. Soak the raw cashews in a bowl covered with water.
  2. Pre-heat your oven to 350°F. Grease a large casserole dish with palm shortening, ghee or coconut oil (I used an 11x14 baking dish).
  3. Heat your fat of choice in a deep pot over medium-high heat. Add onions through mushrooms. Season with sea salt and pepper. Cook until veggies are tender, stirring regularly.
  4. While your veggies are cooking, make the sauce. Drain the cashews and rinse. Add to a blender (I used my Vitamix), along with enough water to just about cover them. Blend.
  5. Add chicken broth, garlic cloves, seasonings, coconut aminos and arrowroot. Blend until smooth and creamy. It will appear runny, but that’s ok. The arrowroot will thicken the sauce once it heats up in the pot.
  6. When the veggies are almost tender, add in the minced garlic. Stir to combine.
  7. Add shredded chicken and spinach to the pot. Stir until spinach is wilted.
  8. Stir in the sauce and allow it to heat through. You’ll notice it to thicken up quite quickly.
  9. Pour the filling into your greased baking dish.
  10. Finally, make your crust. Mix almond flour, sea salt and baking soda in a medium-size mixing bowl. Cut in the coconut oil or ghee with a fork or pastry cutter. Add in eggs and mix with a spatula until it becomes a large ball of dough.
  11.  Put dough onto a piece of parchment paper, slightly larger than your casserole dish. Top the dough with a second piece of parchment paper. Roll out with a rolling pin into the shape of your baking dish.
  12. Transfer the dough by flipping it over onto the filling. Peel off parchment paper. Reshape, as necessary.
  13. Bake in the preheated 350°F oven for 27-33 minutes, or until crust has cooked. You can test this by touching the crust. If it’s hard, it means it has baked long enough. If it’s still soft to the touch, it needs to bake a little longer.
  14. Dig in! Comforting and creamy chicken pot pie with a delicious crust. 


I've made this a few times now. Instead of the crust, you could make a crumble topping. You could also make Paleo biscuits. Or you could leave it crustless. You could thin out the sauce by using less arrowroot and more broth to make a stew or soup.

Question of the Day: Did you/your family ever eat those frozen chicken pot pies with the flaky pastry crust? My family ate them regularly. The crust was my favorite part of the meal. 

Saturday, March 2, 2013

Whole Chicken in the Crock Pot + Homemade Chicken Broth


Every weekend for the past month or so, I've been cooking whole chickens in the crock pot. It's such an economical way to buy chicken. Plus, you end up with flavorful chicken broth. I had never bought a whole chicken until recently. I was intimidated. I didn't know how to cook a whole chicken. It just seemed like a lot of work. I was the kind of person who went to the store and bought boneless, skinless chicken breast. On occasion, I would even buy boneless, skinless thighs. I would spend the $6.99 to buy the pre-cooked rotisserie chickens. I realize now what a rip-off they are. 

There's no reason to be intimidated by whole chickens. Besides, the Crock Pot does majority of the work. The more you make something, the easier it gets to put together. It takes me less than 15 minutes to throw all my ingredients into the Crock Pot. Here's my version of Crock Pot Chicken. 

Crock Pot Chicken
Paleo Rating: 10 Clubs

Ingredients:
1 whole chicken, 3-4 pounds
3 carrots, cut into large pieces
4 celery stalks, cut into large pieces
1 onion, sliced
2 t. garlic powder
2 t. onion powder
2 t. poultry seasoning
Sea salt and fresh-ground pepper - I just sprinkle enough to cover the entire chicken
5 cups water

Directions:
  1. Slice the onion and spread out on the bottom of the Crock Pot.
  2. Place the chicken breast side up on top of the onions. 
  3. Stuff half of the celery and carrot pieces into the chicken and put the remaining pieces around the chicken. 
  4. Sprinkle seasonings on top of the chicken and vegetables. 
  5. Add water to the Crock Pot. 
  6. Cook on high for 5 hours. You could probably cook on low for 8 hours, but I haven't tried this yet. Let me know if you cook it on low and how it goes. 
  7. After the 5 hours, carefully take the chicken out of the Crock Pot (I use tongs and it typically falls apart into a few pieces). Clean the chicken off the bones. Discard the skin. 
  8. Add bones back to the Crock Pot and add an additional cup or two of water. Put the lid back on and cook on low for at least 4 hours (can be cooked on low overnight). 
  9. Pour the broth through a strainer (set atop a large bowl). Let it cool for a little while. 
  10. Pour the strained broth into Mason jars and keep in the refrigerator, for up to a week. You could also freeze the broth in ice cube trays. Once frozen, put them into freezer bags. That way you can just add the cubes to dishes as needed. No need to thaw. 
There you have it. Crock Pot chicken and homemade chicken broth. The chicken is enough for a couple meals and chicken broth can be used as a base to a soup or stew. I use my homemade chicken broth in my Chicken Minestrone Soup and in my Chicken Noodle Soup

Question of the Day: How often do you use your crock pot? I've been using mine at least once per week. I love coming home from work to dinner being done (or mostly done).