Pages

Showing posts with label bacon. Show all posts

Sunday, September 8, 2013

ABC's of Paleo: D is for Daikon Radish (Daikon Radish Pancakes)


It's our fourth week in the series "ABC's of Paleo." Here's a recap of ingredients and what has been made so far.

Week 1 - A is for Artichoke - Roasted Artichokes with Creamy Lemon-Garlic-Dijon Dip
Week 2 - B is for Bison - Bacon-Bison Chili
Week 3 - C is for Cherries - Cherry Pie with Crumble Topping

This week, our ingredient is daikon radishes. You're probably wondering what is a daikon radish. These radishes are a member of the turnip family. They were originally cultivated in southeast Asia. Some of you may have eaten these little gems in the form of a Chinese dim sum dish known as turnip cake. I scoured the internet looking at various recipes for these turnip cakes (AKA daikon radish cakes). All of the recipes contained large amounts of rice flour. I thought about substituting the rice flour with tapioca and/or arrowroot. Then I realized I didn't have all the ingredients for a traditional turnip cake (dried shrimp and dried mushrooms, specifically). It seemed like a pretty time-intensive process to make them. I also searched for Paleo turnip cake, hoping someone had already converted some of the ingredients, so I could adapt the dish from there. No such luck.

I was back to square one. Do I try to adapt a non-Paleo dish or create something new?

I went with the latter of course. I thought the radish cake, or pancake, sounded like a good idea. I do love pancakes. I decided to start with bacon, since some of the turnip cake recipes called for Chinese bacon. Chinese bacon is similar to pork belly, but I only had regular bacon on hand. I wanted to make some sort of patty or pancake, so I knew I would need eggs as a binder, but wanted it to be a little bit thicker than just scrambled egg. That's where the tapioca and almond flours came in. I'm pretty sure I just developed a basic recipe for so many other dishes that I will develop soon.

Paleo Daikon Radish Pancakes
Makes: Approximately Five 5” pancakes
Prep time: 10 minutes
Cook time: 30 minutes

Ingredients:
  • 3 daikon radishes, shredded
  • 12 oz. bacon, cut into bite-sized pieces
  • 4 eggs
  • 2 T. tapioca starch/flour
  • ¼ cup almond flour
  • 2 T. grass-fed butter, ghee or coconut oil (or other cooking fat)
  • Sea salt and freshly-ground pepper, to taste
  • Green onions, to garnish (optional)

Directions:
  1. Heat a large skillet over medium-high heat. Add bacon, stirring occasionally, until crispy. Remove bacon from skillet and place in a paper towel-lined bowl.
  2. While the bacon is cooking, peel the daikon radishes (I used a potato peeler).
  3. Shred the radishes, using either a box grater or your food processor with the shredder attachment (I used my food processor and it took no time at all).
  4. Put the shredded radishes into a large kitchen towel. Squeeze out

    as much excess water/liquid as possible.
  5. Once you’ve removed the bacon from the skillet, add the shredded radishes. Season with sea salt and pepper.

  6. Flip the radishes over a few times to ensure even cooking. They won’t get crispy. I cooked mine for 8-10 minutes, stirring every few minutes.
  7. Remove from pan and let cool slightly.
  8. In a large mixing bowl, whisk the 4 eggs. Then whisk in the tapioca starch and almond flour.
  9. Add the slightly-cooled radishes and bacon to the bowl. Mix well, so everything is coated with the egg mixture and the bacon is evenly distributed.
  10. Add about 1 T. of grass-fed butter to the skillet. Using a ½ cup measuring cup, scoop out batter into the pan, flattening the top with your spatula so it’s somewhat flat. I was able to cook two at a time in my skillet. You could make them smaller and fit more into the pan.
  11. Cook your pancakes for about 4 minutes on each side (or until golden/spotted). They’ll flip pretty easily.
  12. Repeat with remaining pancakes.
  13. Garnish with green onions, if you wish.
  14. Enjoy! 


I loved these pancakes. The batter to daikon radish ratio was just right. They cook and flip easily. The batter itself is fairly neutral tasting, so the bacon and lightly-sweet radish flavor comes out. I think these would make a fabulous breakfast or part of a brunch. I hope you enjoy them as much as I did.

Next up in the ABC's of Paleo: E is for Elk!

Monday, August 12, 2013

ABC's of Paleo: B is for Bison (Bacon-Bison Chili)


This is week two of the series ABC's of Paleo. Here's a recap of what I've already made. 

Week 1 - A is for Artichokes - Roasted Artichokes with Creamy Lemon-Garlic-Dijon Dip

With week two comes a new ingredient, bison! Bison are naturally grass-fed, lean animals. Bison meat has high amounts of iron, making it a great option for those of us who need an extra boost in that area. Per 3.5 oz. serving, bison has the more iron than ground beef, chicken, pork or salmon. It's by far the leanest with only 2.54 grams of fat and only 143 calories. Not only is it packed with nutrition, but it tastes great too!

We've had a number of cloudy and rainy evenings here in Colorado, so I decided to go with chili. How does bacon fit in? Well, I think bacon makes just about anything taste better. So the question is... why not add bacon?

Bacon-Bison Chili
8 servings
Rating: 10 clubs

Ingredients:
  • 12 oz. bacon, cut into bite-sized pieces
  • 1 large onion, diced
  • 4 carrots, diced
  • 2 green bell pepper, diced
  • 6 garlic cloves, minced
  • 2 jalapeños, finely diced
  • 2 lb. grass-fed ground bison
  • 4 T. chili powder
  • 1 T. cumin
  • 1 T. paprika
  • 2 t. oregano
  • 2 t. dried parsley
  • Sea salt and pepper, to taste
  • 2 15-oz can diced tomatoes
  • 2 15 oz. can tomato sauce
  • 1 cup homemade chicken or beef broth

Instructions:
  1. Heat a large stockpot over medium-high heat.
  2. Add the bacon. Cook, stirring occasionally, until crispy. Remove from pot with a slotted spoon and reserve in a paper-towel lined bowl.
  3. Add chopped onion, carrots, bell pepper and jalapeños to the bacon fat. Cook, stirring regularly, for 5-7 minutes or until veggies begin to soften.
  4. Add the ground bison to the veggies, breaking it up with a wooden spoon. Cook for 7-9 minutes, stirring occasionally.
  5. Add the spices and minced garlic. Mix well to combine.
  6. Lastly, add the broth, diced tomatoes and tomato sauce. Stir everything together.
  7. Bring to a boil. Reduce the heat to medium-low and simmer for 20 minutes, stirring occasionally.
  8. Ladle chili into bowls and sprinkle with the reserved crumbled bacon.


You may have noticed some wilted green leaves in my bowl. I had some leftover spinach that needed to be used, so I tossed it into the chili at the end. You can add whatever veggies you have on hand to bulk up the nutritional content. I served our chili with leftover Paleo “Cornbread”. The next day, I ate leftover chili with crushed plantain chips. Either option is delicious. If you are Primal and eat raw dairy, a sprinkle of raw cheddar would taste amazing. 

What did you make with bison? 

Next week in the series: C is for Cherries! Let me know what you'll be making. Keep in mind that I will link up your recipe in my post. 

Friday, April 26, 2013

Zucchini Noodles with Chicken, Bacon and "Bread" Crumbs


Bacon + "Bread" crumbs + Chicken + Zucchini + Olive Oil + Garlic = a flavorful and easy dish that will hopefully satisfy your pasta cravings. Zucchini is a low-carb, Paleo substitute for pasta. If you have a vegetable spiralizer, you could use it to make the zucchini noodles. I hadn't purchased mine yet, so I used my food processor when I last made this recipe.

This dish was inspired by a basic pasta dish consisting of spaghetti or fettuccine, olive oil, garlic and parmesan cheese. I have added some additional dimensions with the chicken and bacon, but it still has that delicate flavor. You could easily omit the chicken or use a different protein. Salmon would taste amazing as well. You could also omit the bacon, if you so choose.


Zucchini Noodles with Chicken, Bacon and “Bread” Crumbs
Serves: 4-5

Ingredients:
  • 7 medium zucchini, shredded (I used my food processor shredder attachment, so they were a little bit shorter than “noodles”)
  • 2 T. + ¼ cup Coconut oil, divided
  • 1 ¼ pounds of chicken tenders or breast, diced or 3 cups shredded rotisserie chicken
  • 4 garlic cloves, minced
  • Bragg’s Sea Kelp Delight Seasoning, to taste (or another 
  • Crushed Red Pepper Flakes, to taste
  • Sea salt and Fresh-ground Pepper, to taste
  • ½ cup almond flour
  • Olive oil, to drizzle at the end
  • 8 slices of bacon, crumbled


Directions:
  1. The first step is to prepare the zucchini noodles. Put them into a strainer (over a bowl or in the sink) and toss them with a little bit of salt. The salt will speed up the sweating process to rid the excess moisture. Let set for 20-30 minutes.
  2. After the sweating time, squeeze them in a kitchen towel (or with paper towels).
  3. While the zucchini is sweating, melt 2 T. coconut oil in a large skillet over medium-high heat. Add chicken in a single layer. Allow to cook for a few minutes before stirring it around. Continue cooking until no longer pink, about 7-8 minutes. If you are using shredded rotisserie chicken, then you'll just need to heat it up for a couple minutes in the skillet. 
  4. Stir in the garlic and seasonings.
  5. Add the zucchini noodles to the skillet and toss around.
  6. While the zucchini noodles are warming up, melt the remaining ¼ cup coconut oil in a medium frying pan over medium heat. Add the almond flour and season with sea salt and pepper. Stir constantly for 2-3 minutes to allow the almond flour mixture to “toast.” If it's too thin, just add a little more almond flour. 
  7. Plate the zucchini-chicken mixture, drizzle with olive oil and top with approximately 2 slices of crumbled bacon and a couple tablespoons of the “bread” crumbs.
  8. Dig in! 


Wednesday, March 27, 2013

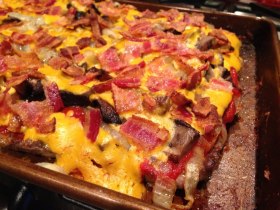
Paleo Hamburger Deluxe Meatza

Hamburgers. Pizza. Bacon. Combine it all together and you get a Hamburger Deluxe Meatza. I was inspired last week when I made PaleOMG's Meat Quiche Crust. I was so excited as I lied down for bed that night that I could hardly sleep. My mind started thinking of all the different creations for meatzas. I came up with this idea for a hamburger deluxe meatza. What does deluxe mean? I consider deluxe a hamburger with mushrooms, onions and bacon. I also knew I couldn't make a meatza without some sort of "cheese." I came up with a "cheddar cheese" sauce with raw cashews, nutritional yeast, basil, red bell pepper and garlic. Such a fantastic meatza. I can't wait to create my next one!

This recipe seems like it's labor-intensive. There are a few parts to making it. Some can be done in advance, such as: cooking the bacon and slicing the mushrooms and onions. Be sure to soak the raw cashews in a bowl of water. I typically do that part in the morning before going to work. If you plan a little bit, the cooking and assembly will be a breeze.


Hamburger Deluxe Meatza

Serves: 5-6

Ingredients:

Meatza Crust:
2 pounds grass-fed ground beef
1 egg
1 t. onion powder
1 ½ t. garlic powder
Sea salt and pepper, to taste

Toppings:
2 T. fat of choice (I used coconut oil, though you could use bacon grease since you are cooking bacon)
2 onions, thinly sliced
3 Portobello mushroom caps, sliced
8 slices bacon, crumbled
1 15 oz. can sugar-free pizza sauce (I used Muir Glen Organic)

“Cheddar Cheese” Sauce:
1 ½ cups raw cashews, soaked in water for at least 6 hours
1 small to medium red bell pepper, cut into a few large pieces
3 garlic cloves
2-3 T. fresh basil leaves
2/3 cup nutritional yeast
Sea salt and pepper, to taste

Directions:

Preheat your oven to 375°F.

To make the crust:

  1. Mix all crust ingredients in a large mixing bowl. You may have to get your hands meaty in order to combine everything.
  2. Pour onto a rimmed metal baking sheet and spread into a thin, consistent layer. I used a 15.25” x 10.25” pan.
  3. Bake in the preheated oven for 15 minutes.
  4. Drain off excess grease (there will be quite a bit).
To make your toppings:

  1. Cook your bacon. I prefer to bake it in the oven (this can be done in advance). If you cook it in the frying pan, you can use the leftover bacon grease to cook your onions and mushrooms. Once cooked, crumble and set aside.
  2. Melt fat of choice in a large pan over medium heat.
  3. Add your onions and toss in the fat so they’re all coated. Season with a dash of sea salt. Cook, stirring occasionally, for about 15 minutes.
  4. Add sliced mushrooms and toss. Sauté, stirring occasionally, for an additional 6-8 minutes, or until the mushrooms are cooked.
  5. Set aside.
To make your “cheddar cheese” sauce:

  1. Drain and rinse the raw cashews. Add to a high-speed blender (I use my Vitamix). Add enough fresh water just to cover the top of the cashews. Blend until smooth.
  2. Add bell pepper, garlic, basil, nutritional yeast, sea salt and pepper. Blend until everything is incorporated. Taste and adjust seasonings, as needed.
To assemble your meatza:

  1. Spread pizza sauce on top of your meat crust. You may not use all of the sauce, so save leftovers for another use.
  2. Add your mushrooms and onions atop the pizza sauce. Spread them evenly across the entire meatza.
  3. Ladle the “cheddar cheese” sauce over the top and cover the entire meatza. You'll have extra sauce. It can be used in/on omelettes in the morning. 
  4. Sprinkle the crumbled bacon on top.
  5. Put back into the oven for 6 minutes. Turn your broiler on high and cook for 4 more minutes.
  6. Cut into 5 or 6 pieces and enjoy! Serve with a simple side salad to round out the meal.


This meal was love at first bite. The meat crust was so incredibly moist (I was worried it would turn out dry). The pizza sauce blended perfectly with the “cheddar cheese” sauce. The bacon added a beautiful crunch. After making and devouring this meatza, I am even more excited to get to work on my next one. I have a really phenomenal idea in mind and hope it turns out as amazing as this one. 


If you like this recipe, please share on Pinterest and Facebook. I appreciate your support! 

Monday, March 11, 2013

Creamy Cauliflower Soup with Broccoli, Bacon & Chives


Recipe ideas hit me at random times. I thought up this soup on a random afternoon at the office. It just popped into my head. Typically when this happens, I will write out the initial ingredients that I think would mesh well together. When I first thought of this recipe, I thought I would use mushrooms, potentially nutritional yeast and not use a rutabaga. The rutabaga came up when I thought of the hash brown alternatives. I'm going to jump in head first tonight with the recipe, because it's getting late and my 5:30am spin class will be here before I know it. 

Creamy Cauliflower Soup with Broccoli, Bacon & Chives
Serves: 6

Ingredients:
3 T. fat of choice (I used coconut oil)
1 onion, diced
1 rutabaga, diced
4 stalks celery, sliced
4 cloves garlic, minced
1 medium head of cauliflower, cut into florets
6 cups chicken broth (preferably homemade)
2 cups water
4 cups broccoli florets
12 slices of bacon (to garnish)
6 T. chives, green onions or scallions, chopped (to garnish)
1 t. dried rosemary
Salt and pepper, to taste

Directions:
  1. Cook your bacon. I typically bake mine in the oven on a baking rack (over a pan, of course) for about 20 minutes at 400 degrees. If you prefer to fry bacon, you can do that. The point is to get the bacon cooking while tending to the soup. 
  2. Melt your fat of choice in a large soup pot over medium-high heat. 
  3. Add onion, rutabaga, celery and garlic to the pot. Cook, stirring occasionally, for 5-7 minutes. Season with sea salt, pepper and rosemary. 
  4. Add the chicken broth, water and cauliflower to the pot. Bring to a boil and let simmer over medium heat for 15 minutes, or until cauliflower is soft. 
  5. Blend the mixture with an immersion blender or in batches in your food processor or stand blender. Add back to the soup pot (still on medium heat). 
  6. Add broccoli florets to the soup. Cook for 6-8 minutes, or until broccoli is tender to your liking. You can cover the pot with a lid to steam the broccoli. 
  7. Taste test the soup for seasonings. Make adjustments as needed. 
  8. Ladle soup into bowls. Top with two strips of crumbled bacon and a tablespoon of chives, green onions or scallions (I used chives). 
  9. Enjoy! 

This soup would be delicious with a slice of Paleo bread or Paleo biscuit. I have a few biscuit and bread recipes that I love. This one (without the honey for a more savory taste), this one or maybe this one. 

My bed is calling my name. Must get a good night's rest tonight. Have a good week! 

Wednesday, January 9, 2013

Whole30 - Day 8

I woke up to the 5:30am alarm (which is mostly for my husband) and still felt pretty tired. I feel like I haven't been sleeping well all week. I already made the decision last night that I would work out during my lunch hour, so I decided to sleep in an extra hour. That extra hour felt pretty wonderful. I'm a slow mover in the mornings. If I didn't have to work outside the home, I would probably wake up naturally around 7am everyday. That would be lovely. When do you wake up during the week? Weekends? 

Work was another crazy day. I tell you, it's never a dull day in payroll. I'm looking forward to a few weeks from now when year end has calmed down a bit. I did get the opportunity to run outside this afternoon. It felt amazing! I was still a little slower than normal, but felt fairly strong. There were moments when I thought my heart rate was going to spike, but I was able to keep it stable. I ran for 37 minutes on an out-and-back route into the State Park. It's a beautiful area. The prairie dogs were out in full force. There were a few Mallard ducks floating around the thawed water (creek/ponds). Since it was such a gorgeous January day for Colorado standards, there were numerous walkers, runners and cyclists out and about. Believe it or not, there was a mom walking a stroller and dog coming upon me as I took this photo. 

Breakfast: I tossed together 1/4 of a sweet potato (diced), 1 diced zucchini and the leftover half of the apple Dijon burger (crumbled) in a frying pan with a little olive oil. I cooked it for about 10 minutes (the sweet potato was still a bit undercooked, but I was running low on time). I threw in a couple eggs at the end and scrambled them up. 
Lunch: Leftover roasted cabbage, rutabaga hash browns and pulled pork. I anticipated that I'd be hungry after running, so I brought some blackberries to snack on. I neglected to take any photos of lunch, since it looks almost identical to last night's dinner (minus the egg). 
Dinner: Creamy cauliflower soup w/ gremolata and sugar-free bacon ends. I adapted a non-Paleo recipe from a magazine (not sure which one - I just have the torn out page). I'll post the recipe for the soup this weekend. The gremolata tasted a bit like crushed Ritz crackers. Yum! I made a simple salad with mixed greens, tomato and avocado with a basic lemon juice/olive oil/sea salt/pepper dressing. So good. I also drank a few sips of the Passionberry Bliss Kombucha I opened last night. 
Top left: Breakfast. Bottom: Soup w/ gremolata & bacon. Top right: Simple salad.

Hope you are all having a fabulous week! Congrats! We made it halfway through the workweek. Now, it's time for some much-needed sleep. Good night all and make tomorrow even better!